Thursday, February 28, 2008

Crafting Your Business--Better Photos, Pt.2


In this part of the Ineffectual Photographer's Guide to Possibly Somewhat Better Photographs :) , I want to talk a bit about the details. A shot that shows the whole item (whether it's a book, or other craft item) gives the viewer some information about what the item looks like, but it doesn't tell them the whole story. After all, when they are buying online, they can't pick up the item to look at it carefully and see all the wonderful details that make it uniquely handmade.

So, before you take photos, look carefully at your item. What features make it uniquely beautiful, or interesting, or useful? Those are the things that would interest a potential buyer, and you should highlight them in your photos.
In the case of the book pictured here, the unique features that I want to highlight are the stitching along the spine, and the hand-torn writing/sketching paper. Those things aren't as noticeable in the picture above, so I did a close-up shot, so the viewer can get a better look at those details. You may want to do several close-ups to capture everything important.

Another advantage of using close-up shots is that it gives variety to your photos. Instead of four shots taken from the same distance, you can use a combination of distance and close-up shots to make your website or Etsy shop more interesting.

When you are getting ready to take photos of your work, it might be helpful to write down a list of features you want to highlight--it can save time. You can also use the crop feature in Photoshop, Picasa or other photo editing software to get the close-ups you want.

Tuesday, February 26, 2008

Not So Buttoned Up


The other day I bought some vintage buttons--according to the information that came with them, they were found in storage in the Soho district of New York City. Some were made in the US, and some imported from Italy and Holland.

I'm not a button expert, but most of them look to me like they are 1940s-1960s-vintage. I'm going to play around with using them on my leather journal/sketchbooks. There are lots of interesting shapes and colours of buttons--tortoiseshell, and sea green, and bold black/white, and some colours I can't really even describe-- so it should be fun to see how they come out.

Here are a couple of pictures of the buttons. I'm storing them in a box from Korea that my husband gave me--it has four little drawers that seemed just right for vintage button storage.

I remember there was a jar of old buttons around our house when I was a kid, and I loved to pour them out of the jar and examine them, turning them over in my hands. I've always found buttons kind of fascinating, although I can't say exactly why.

Thursday, February 21, 2008

Family Secret Album


I'm a bit late in posting this, but the TJBookarts Weekly Challenge a couple of weeks ago was on the theme of "album." I thought about what people do and don't put in family albums, and just for fun, created an album for the information that doesn't make it into the "official" family album. It's very small (about 2 1/2" x 3 1/2"), just the right size to hide in a safe place. :)


Here are pictures of the outside and of the pages of the album. I used blood-red silk book cloth, and bound the covers together using a branch of a rose bush (complete with thorns). The album pages are made from handmade Canal paper. This paper was made from pieces of jeans and other clothing--it has actual hunks of orange and blue and red cloth embedded in it. I hand-tore the pages, so bits of the cloth stick out, sort of an allusion to the family "dirty laundry" that might be recorded there. The end papers are made from red and blue striped Japanese stenciled paper. The album is just the right size to hold shocking genealogical charts, diagrams, and very small confessional letters!

Tuesday, February 19, 2008

BEST Charity for Literacy

I am a member of BEST (Bookbinding Etsy Street Team) and we are having a nine-week fundraiser for the charity H.E.L.P. International. H.E.L.P. a registered charity dedicated to providing health care and education for children throughout the world who are orphaned, destitute or disabled.

BEST members are selling selected handcrafted books on their Etsy sites and 100% of the profits (minus Paypal and Etsy fees) will be sent directly to H.E.L.P. Here is the book I'm donating. It's a small handbound blank journal (4 1/2" x 6") with writing paper that is also good for sketching and light wash watercolour. It's a hardcover book, decorated with handmade Korean and Thai banana bark papers. You can find out more about this book at my Etsy shop.
To see other BEST member's donated books, check out the BEST blog. It's an opportunity to support a great cause, and get yourself a fabulous little handmade book :)

Saturday, February 16, 2008

Useful Things


Here are a few little items that make bookbinding easier:

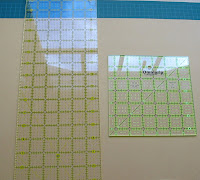
One day I was browsing through the local craft shop, and in the quilting section found these grid thingies. They have turned out to be incredibly useful in all sorts of ways--I use them for measuring patterns for book covers, the edges for tearing handmade paper to size, for measuring where to put the holes for sewing leather, and on and on. I'm really crappy at math, so these little tools make life much easier!


This is an antique flat iron that I use as a weight. I picked it up at a neighbour's yard sale a few years back, and at some point realized how handy it was for keeping things like leather from scootching around while I am cutting it. I always liked my flat iron's curvy shape, and recently discovered a new good use for it--I use it as a pattern for cutting a nice, rounded edge on leather book covers. You can still find these around at antique shops, but they are getting more expensive, sadly, as people like to use them for decorating. Also, some of them have had a hard life, so are a bit rusty and in need of a bit of buffing and polishing (but then again, aren't we all?).


Finally, here's one of my very most favourite items in my bookbinding studio: my kitschy red pincushion! My aunt made this for me back in the 1970s, from a can lid, some red felt, rick-rack spray-painted gold, and beads. Divine! As you can see in the picture, it is just the right place to keep bookbinding needles :)

Thursday, February 14, 2008

Moopf at Work

I love making my books, and often wonder what happens to them after they've gone off to new homes. The books are finished when I sell them, but, in a way, they aren't complete until the pages are filled in.

Our Etsy friend moopf recently bought a water hyacinth book from my Etsy store to use for sketching, so I asked him if he would share some pictures of himself with his book, and here they are. I have to say, I'm very excited to see the book with his great designs in it!

I also asked him if he would tell us a little bit about himself and his work:

"My name is Gareth Lancaster and I've been creative in one way or another for as long as I can remember. I enjoy abstract and cartoon work and these days most of my work is sketched first using pen/pencil and paper and then I re-create the designs using Adobe Illustrator to ensure crisp lines and perfect reproduction. I started selling on Etsy, at http://moopf.etsy.com/, in October 2007 and sell a range of badges, magnets, gift cards, notecards and prints. I'll soon be adding original acrylic paintings as well."

Thanks, mooph!
Hope you will check out his store--he has excellent stuff, and I do believe he is giving away free stickers right now....

P.S.: If you have one of my books and would like to post some pictures of it on this blog, I'd love to see them! Just leave me a note at my Etsy store http://moonbindery.etsy.com/.

Tuesday, February 12, 2008

Pictures of Old Bindings


I was recently noodling around on the Internet, looking at pictures of old bookbinding styles for inspiration in making my books, when I ran across a University of Iowa website that has pictures of reproductions of old books, including early codex bindings, stationer's account bindings, and medieval monastic bindings. Here is an example of an account book that uses a binding style that was common in the 9th-14th centuries.


Being a bit of a book junkie, I was immediately interested. I like how they include information about the time period of the binding style. Also, original books are often in pretty bad condition, so it's interesting to see modern versions of old bindings, to see how they might have looked when they were new.


Here is a picture of three books I just finished that have medieval-style bindings (the same ones I have pictured in my previous post) . They are all limp leather bindings. For the books on the left and the right, I used a longstitch/linkstitch binding, and the middle one is a different variation on a longstitch binding. If you look carefully at both pictures, you can see that the one above (from the University of Iowa site) is also a longstitch binding. There are many variations on the longstitch binding, which, for me, is what makes them so interesting to do.
Update: here is a link to the U of Iowa site, which I forgot to include :/

Sunday, February 10, 2008

New Longstitch Journals


Dipped into my Keith Smith book again, and made the three longstitch journals you see here to put in my Etsy shop. I have a shameful confession to make--I find Keith Smith a little hard to follow :/ Maybe it's just me, but I find the directions and the diagrams don't always work together.


So I did what I usually do, which is find two or three sets of directions for a particular binding style, and between looking at all of them, I can usually get my questions answered and come out with a good binding. And sometimes I come up with my own, slightly different variation on a binding style.


I think that's a good thing, actually. I've found that most binders have their own ways of doing things, so each binder's books have a certain "signiture" character that reflects the materials they choose to use, and their own their particular style. That's one reason why handmade books aren't boring!

Thursday, February 7, 2008

Losing Craft

The latest Three-Minute Egg from Crown Point Press has an interesting and thought-provoking theme. Apparently several schools and museums dedicated to teaching or exhibiting crafts have lately dropped the word "crafts" from their names (for example, in New York the former American Craft Museum is now called the Museum of Arts and Design).

Kathan Brown, who presents the Three-Minute Egg, suggests that the word "craft" is being dropped not because it is unimportant, but because it is just "a given" in the art world these days, and that craft and art are all part of one work, meaning that embroidery and prints and paintings should all be shown together and not separated out. She uses the example of artist Laura Owens, who does printmaking, and also does embroidery pieces that she has skilled craftspeople execute for her, following her designs (this rooster print is an example of her work).

If you would like to watch this Three-Minute Egg, here is the link: http://www.magical-secrets.com/egg

Saturday, February 2, 2008

New Banner

Amy Blandford did the new banner for my shop and blog that you can see above. I'm really happy with it--it has an Arts & Crafts design, which I love, and even a little moon :)


In case you aren't familiar with the Arts & Crafts movement, it was started by a group of artists and thinkers of the mid-19th century, including William Morris and John Ruskin. They were reacting against the increasing industrialization of England, and the way that true craftsmanship was being replaced by cheap, mass-produced junk (sound familiar?). They promoted crafts, and the highest standards of craftsmanship. Here you can see an example of a wallpaper pattern William Morris designed. They were also a bunch of free-thinkers, and got involved in all sorts of juicy scandals, which I confess I also love to read about (hee, hee).


You can check out more of Amy's great designs at her Etsy store: http://www.etsy.com/profile.php?user_id=5084799

and her website at http://www.amyblandford.com/index.html

Friday, February 1, 2008

Medieval Bookbinding


I've been reading a great book called The Archaeology of Medieval Bookbinding, by J. A. Szirmai. He writes about a variety of bindings that were used in the middle ages, but the chapter that I was most interested in is the one on limp leather bindings. Not a lot has been written about the history of this style of binding, so it was good to be able to learn more about it.
For those of you who aren't familiar with them, limp leather bindings are basically soft cover leather books (here is an example of one that I made), with decorative stitching on the spine that looks pretty, and also attaches the paper to the leather. I love limp leather bindings, because they are strong and elegant, and also have a wonderful history. It's cool to be able to write in a book that is made basically the same way that one would have been made 700 years ago!